
Matrix Opening Tutorial
One day when I was surfin' the net I came across the trailers for Matrix Revolutions*, After I watched all of them, I asked myself: how did they do that?
After several months I slowly began to come across a method that would give me a similar effect (of a slightly lesser quality) on blender using animated textures and particles. Below is the method that I used and futher applications that I have found for it. I assume that you have a decent understanding of texturing, blender's sequence editor and particles. You will also need to tweak your setings, to get the 'effect' that is just right for you.
Basic Principle
What we are going to be doing is creating a vertical column texture of a moving string of characters and then map this to a dupliverted quad that is moving in the downward direction. We will have to get our particle system tweaked just right so that the downward velocity matches the upward velocity of the texture.Creating the column texture
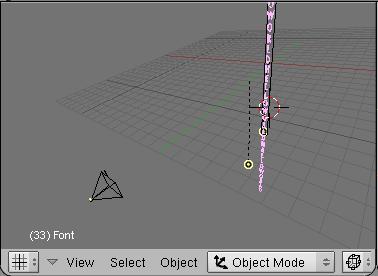
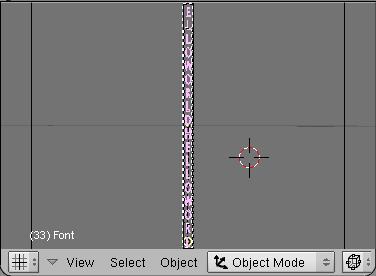
What we are going to do first is create a column texture that will have our text move up the scene as time progresses. To do this we set up the following scene:
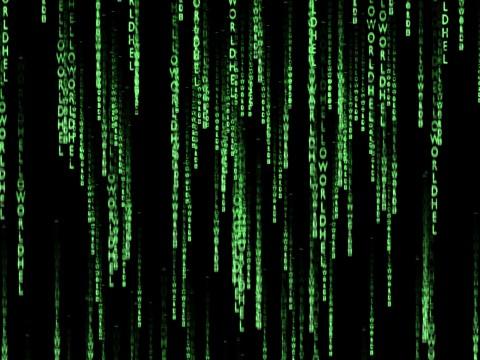
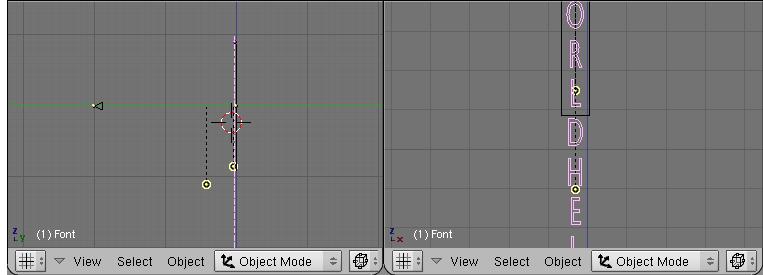
In the other screen dump you can see that our camera views one column of characers, here it is "HelloWorldHelloWorldHelloWorld..." however it must be contineous (i.e. with no spaces separating words) and the edge of the camera must just include the text - there must be very little space around the edges. There also must be enough of the repeating string to do at least one full, complete cycle. Otherwise when the texture loops it will look odd. To be kind to you I will tell you that the dimensions of the frame are 80x1879, so try to fit your text around these numbers.
Now that we have gotten our prititives organised we will now add our lighting. We will do so in such a way that the bottom of the strip will be bright and the top half will eventually taper off until it can't be seen. To do this I have used two lights as shown in the above screen grab. The light that is closest to the bottom of the strip is ment to simulate the brilliant effect of the fluorescing cursor, it has a light intensity of ~0.5. The second light which is futher away serves to illuminate the rest of the strip - making sure that a mimimum of the strip can be seen. You will also notice that I have an extra quad behind the text strip, this is to make it easier to align the camera and to get the position of the strip sorted out for animation.
You will want to render several test renders to get everything as good as you can get it. once you have reached perfection move onto the next step. At this point I should tell you that the string has no material (however you may choose to add one if you want).

Now what we are going to do is animate our text string. To do this we are going to set the current frame to 1, insert a position IPO with the IKEY, advance the current frame ahead by three frames and then add another IPO key. For this second IPO key we will move the strip up one integer character height and set the curve interpolation mode to Constant. You will keep doing this until you have completed one full cycle, for me it required about 11 keys, which consumed a total of 33 frames.
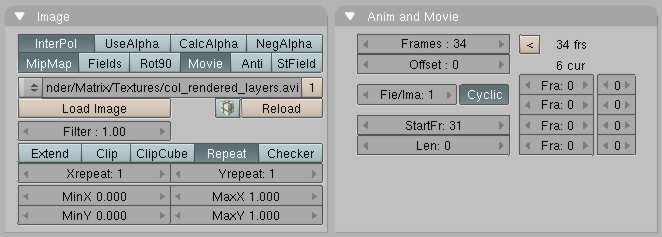
When you have finished with the animation, set the File Format to 'AVI Jpeg', and choose a directory to save the rendered texture. I called mine coltex.avi, you may choose something different. For the Render Panel I chose an OSA of 5 and disabled motion blur. It is up to you wheather you want to use the unified renderer, however when I tried it I saw no visible difference.
Render the frames, one you have done so, save your work - you will come back to it later to modify your settings.
The Processed Texture
In the movie, whenever the strip was seen falling from the top of the screen it left a trail of former characters that was eventually over written with new characters. This was to communicate to the user the long term glowing effect of phosporus. Here, for this step we are going to mimic this step, but it will not come to close to what the special effects people accomplished in the actual movie.
Creating the Texture
We are going to use blender's sequencer to create the finial texture strip. To create it we are going start with a new .blend file, and load up our previous strip that we rendered in the sequence editorand then duplicate it, so we have two layers of the texture. There is one difference though in that the second layer will be delayed by three frames (or what ever your IPO delay was) to mimic the phosphor effect of the matrix. Further more this second layer will have its multiplication factor set to 0.6 (via the NKEY).

Once you have added the strips then add an 'Add' effect, summing both of the strips. Once you have done this then set 'Do Sequence' in renderbuttons before you render it. When you are setting the render length (i.t.o. rendered frames) make sure you have the rendered length the same number of frames as the frame strip that you rendered previously.
An Improvement
Because these textures are going to make the finial character effect, you may want to render more than one video texture from the above sequence but from a different start point in the sequence. This is so when you have all of the columns of characters falling down from the top of the screen to the bottom of it they won't all seem synchronized.I haven't tried it but one definite improvement would be to use the blur plugin off the internet to 'fuzz up' the second layer to give the strip a glowing effect, making the finial result closer to that found in the movie.
The First Impression
Now, once we have our new video texture rendered we will start modelling the scene that greeted the matrix movie fans the first time they saw it. Our first step is to create a new .blend file that we will use to store the scene. Once you have done that create a quad that will be textured with our video texture. To make sure that our quad is the same proportional size as the texture, copy the coordinates (80x1879) into SizeX and SizeY of render buttons and resize your quad until it just fits into the view of the camera. Then change your frame settings back to there default settings. I shouldn't have to tell you that the camera should be facing into the scene (the same direction pointed to by the view after pressing KEYPAD1). Below is an OpenGL preview of our goal:
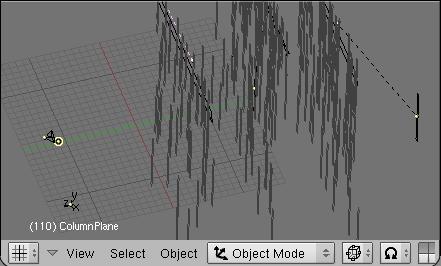
In it you can see that we have particle emitters which are giving off dupliverted quads that has our texture on it, as time progresses a negative force in the Z direction will pull the quads downward. You can either use a negative force or you can use the "Norm" slider to give the strip a constant velocity.

Above is a screenshot of the particles and amimation settings that were used in my results. You may have to tweak all of them to get better results - especially the particle number.
Column Materials
Once we have our particle system setup we will need to give it its material settings, this will include our video texture that we have made and a marble texture that is used to dirt the video texture - to account for the imperfections in the virtual CRT surface.Below are the settings for the column quad (i.e. the mesh that was parented to the grid that had the particle effects attached to it.
Material Settings
Instead of showing a screenshot, I will just list the settings that are different from the defaults.- Enable the Shadeless button
- Set the material colour to RGB(0.26, 1, 0.273) and the Alpha to 0.0
- There is nothing to change under the 'Shaders' panel
- Under the 'Mirror Transp' Panel set Ztransp so that the quad will have true transpearancy.
- The Video Texture has default Map Input settings
- Its Map To Settings are Col unset, Alpha and Emit are set.
- The Lines texture has its texture coordinates set from Orco to Global and its sizeX=0.2, sizeY=15.8, sizeZ=1.0
- The Lines texture has its Map To settings set to Col=1, Alpha=1 and its texture effect set to 'Mul'.
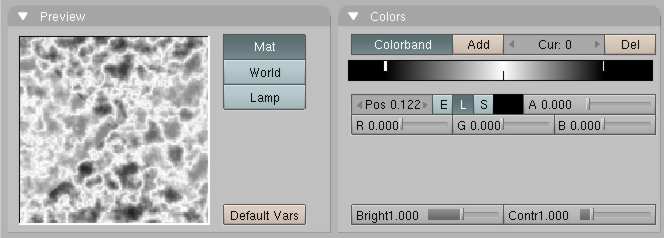
For the Lines texture I used a clouds texture but with the colorband to create a texture that had a random and white bold line. For this clouds texture I used soft noise, with a noise size of 0.250 and a noise depth of 3. Color band details and expected output are shown below:
Rendering
The rendering is the easy part... In Renderbuttons set OSA to 8, enable motion blur, set the output to 'AVI Jpeg'. Set the beginning and end frames of your animation and the background color of the animation to black (in Worldbuttons).And then let it render...
*Matrix is a registered trademark of warner bros studios
Email: web@simonharvey.com